Panoramic Fun
On a recent visit to the Pali Lookout, I decided to try taking a bunch of snapshots of the Windward side of the island intending to stitch them together into a giant panoramic when I got home. Maybe it might make a nice wall display someday? I knew that the latest version of Photoshop CS3 had this amazing one-step tool that would do all the hard work for me.
It came out quite nice in fact, it could have been a less cloudy day, but when are you ever going to find the Windward side without clouds hmm?
The process was so simple that I thought I'd quickly share that with those of you who might have a passing interest in photography like I do.
Step #1
When you're on location, just take your camera out and shoot across your scenery. You don't even need a tripod anymore these days, just take multiple shots across the view paying special attention to overlap each shot just a tiny bit.
Step #2
Open all of these scenic photos in Photoshop CS3. FILE > OPEN > Find your photos and open all the ones you need for your panoramic.
Step #3
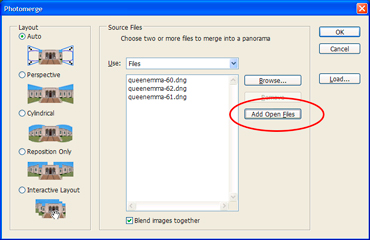
Go to FILE > AUTOMATE > PHOTOMERGE...
Just keep everything else at default. It should be the "Auto" layout and the "blend images together" option should be checked.
Click on the "ADD OPEN FILES" button and Photoshop should automatically add all your open files to the list. Click OK to launch Photomerge and watch the magic happen.
Viola! That's it. Photoshop magically stitches all your photos together, adjusting for color, position, & perspective. There's some pretty sophisticated math those programmers must have used to accomplish this.
If you don't have the latest version of Photoshop, I know older versions of Photoshop Creative Suite had the Photomerge tool in it but it might not have been as intelligent in past versions. In any case, it's still WAY better then the old scrapbook & Scotch-Tape methods our parents used.
Labels: graphic


